At Drivy, we heavily use Embulk for our data needs. Embulk is an open-source data loader that helps data transfer between various databases, storages, file formats, and cloud services. It can automatically guess file formats, distribute execution to deal with big datasets, offers transactions, can resume stuck tasks and is modular thanks to plugins.
Embulk is written in JRuby and the configuration is specified in YAML. You then execute Embulk configuration files through the command line. It’s possible to inject environment variables and other configuration files can be embedded thanks to the Liquid template engine.
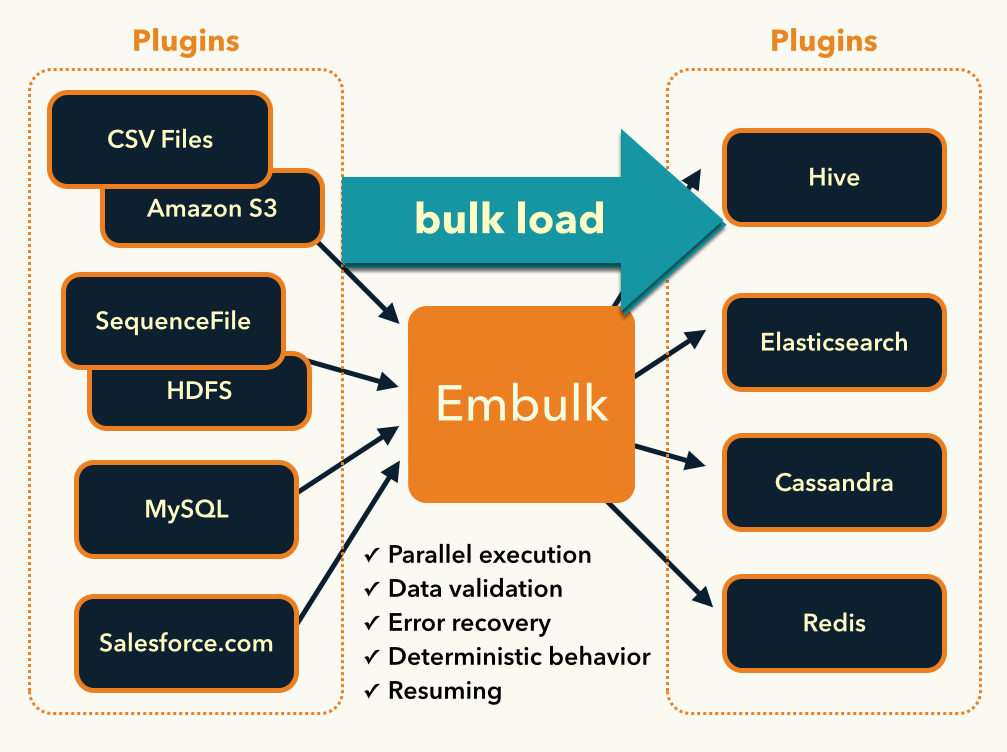
The available components are the following:
The plugins are listed on the Embulk website and are usually available on GitHub. If needed, you can write your own plugin.
At Drivy, we currently have a bit less than 150 Embulk configuration files and we perform nearly 1,200 Embulk tasks everyday for our ETL needs running on Apache Airflow. Our main usage is to replicate tables coming from MySQL to Amazon Redshift, our data warehouse.
For example, here is the Embulk configuration file we use to pull data about push notifications from MySQL to Redshift, incrementally.
This is stored in push_notifications.yml.liquid:
{% include 'datasources/in_mysql_read_only' %}
  table: push_notifications
  incremental: true
  incremental_columns: [updated_at, id]
{% include 'datasources/out_redshift' %}
  table: push_notifications
  mode: merge
  merge_keys: [id]
This short configuration file uses powerful concepts. First, it leverages incremental loading to load records inserted (or updated) after the latest execution. In our case, we will load or update records according to the value of the latest updated_at and id columns. Records will be merged according to the id column, which is a primary key. Secondly, we use the Liquid template engine to pull two partials. datasources/in_mysql_read_only is used to specify the common MySQL configuration for the input mode and datasources/out_redshift is used to specify the Redshift configuration for the output mode.
Here is what the file datasources/out_redshift.yml.liquid looks like:
out:
  type: redshift
  host: {{ env.REDSHIFT_HOST }}
  user: {{ env.REDSHIFT_USER }}
  password: {{ env.REDSHIFT_PASSWORD }}
  ssl: enable
  database: {{ env.REDSHIFT_DB }}
  aws_access_key_id: {{ env.S3_ACCESS_KEY_ID }}
  aws_secret_access_key: {{ env.S3_SECRET_ACCESS_KEY }}
  iam_user_name: {{ env.S3_IAM_USER_NAME }}
  s3_bucket: {{ env.S3_BUCKET }}
  s3_key_prefix: {{ env.S3_KEY_PREFIX }}
  default_timezone: {{ env.REDSHIFT_DEFAULT_TIMEZONE }}
Basically, it describes how to connect to our Redshift cluster and it respects the format defined by the Redshift output plugin for Embulk. Note that we reference almost only environment variables that will be injected at runtime. This is used to keep secrets out of the codebase and gives us the ability to switch easily between several environments (production and staging for instance).
Running the script is then as straightforward as executing the Bash command
embulk run push_notifications.yml.liquid -c diffs/push_notifications.ymlafter setting the required environment variables. Embulk will keep the last values for the updated_at and id columns in diffs/push_notifications.yml for future executions.
The diffs/push_notifications.yml file looks like this:
in:
  last_record: ['2017-12-11T13:51:41.000000', 11230196]
out: {}Here is how we import CSV files into Redshift.
Embulk ships with a CSV guesser, that can automatically build a configuration file from a CSV file.
If we start from a sample configuration file like this one that we will write in cr_agents.yml.liquid:
in:
  type: file
  path_prefix: {{ env.EMBULK_PATH_PREFIX }}
  parser:
{% include 'datasources/out_redshift' %}
  table: cr_agents
  mode: truncate_insert
and by running the Bash command
EMBULK_PATH_PREFIX=/tmp/agents.csv embulk guess cr_agents.yml.liquidEmbulk will then generate the appropriate CSV boilerplate like this, after parsing our CSV file.
in:
  type: file
  path_prefix: {{ env.EMBULK_PATH_PREFIX }}
  parser:
    charset: UTF-8
    newline: CRLF
    type: csv
    delimiter: ','
    quote: '"'
    escape: '"'
    null_string: 'NULL'
    trim_if_not_quoted: false
    skip_header_lines: 1
    allow_extra_columns: false
    allow_optional_columns: false
    stop_on_invalid_record: true
    columns:
    - {name: id, type: long}
    - {name: drivy_id, type: long}
    - {name: zendesk_user_id, type: long}
    - {name: talkdesk_user_name, type: string}
    - {name: first_name, type: string}
    - {name: last_name, type: string}
    - {name: country, type: string}
    - {name: second_country, type: string}
    - {name: third_country, type: string}
    - {name: fourth_country, type: string}
    - {name: is_drivy, type: boolean}
    - {name: is_active, type: boolean}
{% include 'datasources/out_redshift' %}
  table: cr_agents
  mode: truncate_insert
You can then adjust manually the configuration for the CSV parser if needed.
Finally, we’re now ready to import our CSV file into Redshift. This can be done thanks to the Bash command
EMBULK_PATH_PREFIX=/tmp/agents.csv embulk run cr_agents.yml.liquidBecause we specified that we want to use the truncate_insert mode for the output plugin, Embulk will delete first every record in the destination table cr_agents before inserting rows from the CSV file.
I hope you now have a quick grasp of what Embulk is and how it can speed up your data import and export tasks. With simple configuration files and a good plugin ecosystem, it is our go-to solution almost every time we need to perform data transfers in our ETL.